
DMARC Record Generator: The Complete Guide To Creating A Secure DMARC Policy In Minutes

What a DMARC Record Generator Is and Why It Matters for Email Security
A DMARC record generator, often referred to as a DMARC record wizard, is a crucial resource for organizations aiming to enhance their email security and achieve compliance with DMARC standards. This tool simplifies the creation of a DMARC record, enabling domain owners to customize it according to their specific security needs and business objectives, whether for a primary domain or its subdomains.
DMARC, or Domain-based Message Authentication, Reporting, and Conformance, is an email authentication framework intended to combat issues like phishing and spoofing. By leveraging SPF (Sender Policy Framework) and DKIM (DomainKeys Identified Mail) for email source verification, a DMARC policy directs receiving mail servers on how to respond to messages that fail authentication checks. This significantly enhances the authenticity of email streams and shields organizations from threats related to email delivery.
Many organizations struggle with managing DNS records, which is why tools such as MXToolbox DMARC Record Generator, SuperTool, and dmarcian DMARC Record Wizard are incredibly useful. With their intuitive interfaces, these tools facilitate quick generation of DMARC records, minimizing the chances of misconfigurations that could cause delivery problems or, even worse, lead to blacklisting and susceptibility to email abuse.
Key DMARC Tags Explained: p, rua, ruf, pct, adkim, aspf, and More
A DMARC record is a specific type of TXT DNS record that contains important tags used to dictate the policies for enforcement, reporting, and alignment. Understanding these tags is essential when creating, generating, or verifying a DMARC record with any tool or management platform.
Primary and Secondary DMARC Tags
-
v: (Version) This should always be set to “DMARC1”; it designates the record as a DMARC type.
-
p: (Policy) This field is mandatory. It defines the DMARC policy for the domain as either `none`, `quarantine`, or `reject`.
-
rua: (Aggregate Reports URI) Specifies the email addresses where aggregate reports will be sent — these are XML-based documents that provide an overview of authentication performance.
-
ruf: (Forensic Reports URI) Indicates the email addresses that will receive detailed individual failure reports (forensic reports) regarding authentication errors.
-
pct: (Percentage) Indicates the proportion of emails that are affected by the DMARC policy (for example, initiating with 50%).
-
adkim: (DKIM Alignment Mode) Determines the level of strictness in matching the DKIM signature to the domain: `r` for relaxed and `s` for strict.
-
aspf: (SPF Alignment Mode) Controls the strictness of SPF record alignment with sending domains or their subdomains.
Advanced and Optional Tags
-
sp: This tag outlines the policy for subdomains if it varies from the DMARC policy applied to the primary domain.
-
fo: This tag specifies the conditions under which failure reports are generated for authentication issues.
Grasping and setting up these tags — whether done manually or via a DMARC record generator — establishes a strong framework for email authentication and safeguards against impersonation attempts.
Step-by-Step: How to Create a DMARC Record in Minutes
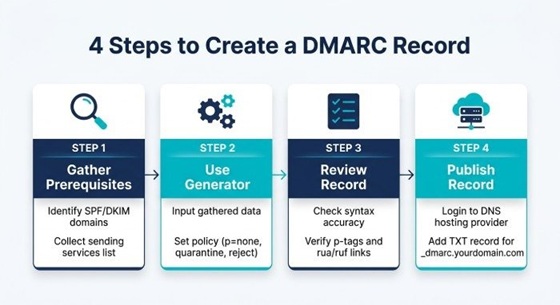
With the help of contemporary DMARC record generators and user-friendly DMARC wizards, even those unfamiliar with DMARC can easily generate and deploy their DMARC records. Below is a typical outline of the steps involved:
1. Gather Prerequisites and Assess Your Domain Environment
-
Utilize MXToolbox or SuperTool to execute an MX lookup and inspect DNS settings so you can assess the current DNS records.
-
Examine email headers to identify your current SPF settings and DKIM configurations, leveraging diagnostic tools such as SPF Surveyor or DKIM Inspector.
-
Set up a dedicated email address for receiving both aggregate and individual failure reports, typically formatted as a role-based mailbox like dmarc-reports@example.com.
2. Access and Use a DMARC Record Generator
-
Open your chosen DMARC record generator or wizard. Popular options include dmarcian's DMARC Domain Checker, MXToolbox's SuperTool, or platforms equipped with integrated wizards like DMARC Management Platform.
-
Input your domain (or relevant subdomain), choose your preferred DMARC policy (none, quarantine, or reject), and indicate the reporting address for both rua and ruf tags.
-
Consider advanced settings, such as alignment modes (adkim, aspf), subdomain policies (sp), and the percentage of emails to which the policy should apply (pct).
-
The DMARC record generator will automatically create your DMARC record, giving you a TXT record in the correct format.
3. Build and Review Your DMARC Record
Ensure the generated record is accurate by utilizing a DMARC inspection tool or a validation utility, such as DMARC Inspector or Detail Viewer. Confirm that the addresses for both aggregate and forensic reports are correctly configured, and that your policy settings and alignment options align with your desired approach to email security.
4. Prepare to Publish DMARC Record
-
If you're not experienced in DNS editing, seek assistance from your internal IT department, explore DMARC support options, or consider hiring DMARC consulting and onboarding services from providers such as DMARC Services.
-
To maintain complete SP email authentication and DMARC alignment, make sure your SPF record and DKIM keys are regularly updated.
Choosing the Right DMARC Policy: none vs quarantine vs reject
Choosing the right DMARC policy (p tag value) is essential when creating a DMARC record, as it impacts both initial monitoring and the overall health of your email in the long run.
Comparing DMARC Policies
“none” Policy
-
Objective: Gathers and analyzes data without interfering with email transmission.
-
Scenario: Ideal for DMARC implementation; best used during the early stages to gather summary reports and address any potential alignment or delivery problems.
-
Advantage: Does not compromise the delivery of legitimate emails while conducting diagnostics and monitoring.
“quarantine” Policy
-
Objective: Instructs mail servers to view unauthenticated messages with caution (for instance, by directing them to spam or junk folders).
-
Scenario: This is typically a middle phase; frequently employed after reviewing summary reports and fine-tuning SPF email validation and DKIM settings.
-
Advantage: Offers a safeguard against misuse while reducing the likelihood of inadvertently filtering out valid emails from the inbox.
“reject” Policy
-
Objective: Direct recipients to reject emails that do not pass authentication verification.
-
Scenario: This step represents the conclusion of the DMARC implementation process, following a thorough analysis of both aggregate and forensic reports, and ensuring that all valid email senders are compliant with DMARC.
-
Advantage: Provides optimal defense against domain impersonation and phishing attempts.
Recommended Approach: Start with a policy of 'none' to gather data, utilize your DMARC management system or Alert Central for report assessment and visualization, and then systematically move towards 'quarantine' and eventually 'reject' as you improve DMARC compliance and gain assurance in your setup.
Publishing, Testing, and Monitoring Your DMARC Record for Ongoing Protection
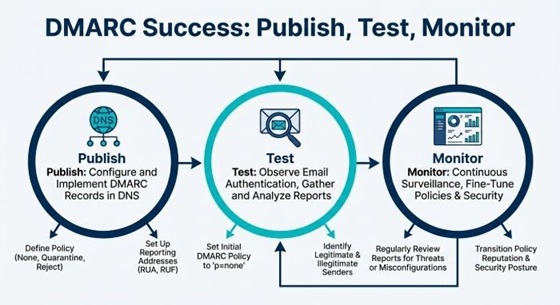
Once you've created your DMARC record, it's essential to adopt a systematic method for publishing, testing, and continuously monitoring it to ensure long-term email security.
Publishing Your DMARC Record
Publish the generated DMARC record as a TXT DNS entry with your domain's DNS provider (for example, _dmarc.example.com), then verify its propagation and accuracy using DNS lookup tools such as SuperTool or MXToolbox. Regularly reviewing your DMARC Report helps confirm that the policy is working correctly and identifies any email authentication issues. If you send emails from subdomains, be sure to create and publish a separate DMARC record for each relevant subdomain to ensure complete protection across your email infrastructure.
Testing and Performing a DMARC Check
Utilize DMARC verification tools like DMARC Inspector, DMARC Domain Checker, and Detail Viewer to ensure the accuracy and proper formatting of your records. Conduct test email distributions, assess the results, and examine email headers with either analytical tools or the diagnostic features integrated into your DMARC management system.
Monitoring: The Key to Ongoing Email Health
-
Establish the collection of aggregate (rua) and forensic (ruf) reports using XML format, and incorporate data visualization tools such as Delivery Center and Domain Overview dashboards.
-
Regularly keep an eye out for emerging delivery problems, possible blacklisting, or unapproved email sources.
-
Implement automated notifications for key incidents through Alert Central.
-
Continuously improve and update your DMARC policy in response to changes in email sources or characteristics of the stream.
Leveraging DMARC Tools and Services
Leverage advanced tools and resources for comprehensive DMARC management:
-
SPF Record Creator & DKIM Validator: Ensure validation of your supporting records.
-
BIMI Solutions: Integrate Brand Indicators with DMARC for enhanced visual credibility.
-
Community Resources (Forums/Blogs/DMARC Academy): Keep up-to-date with best practices and updates in the field.
-
API Documentation & XML-to-Readable Converter: Streamline integrations and reporting workflows for larger organizations.
By employing a top-tier DMARC record creator, following a strategic DMARC implementation plan, and maintaining consistent oversight through powerful DMARC tools, you can safeguard both your domain and subdomain email communications, uphold ongoing DMARC compliance, and strengthen your organization’s email security for the long term.